Add an MX Entry in cPanel

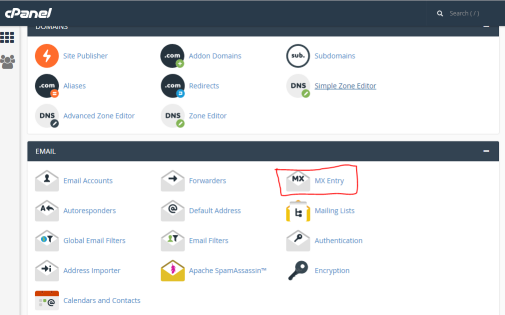
Step 1: After logging into cPanel, on the home screen Click on the MX Entry icon


 Step 2: Setting a custom MX entry is useful if you want your email to be handled by another server or if you want to set-up a back-up email server.


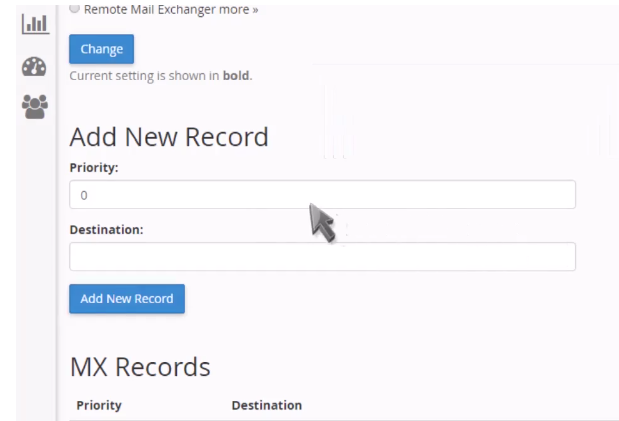
Step 3: Enter a priority number for the new MX record: the lower priority numbers (e.g. 1,2..) will be tried first, followed by higher priority numbers.      

          E.g. If you add xyz.com and set priority 1 for it, and if there is a default mail server abc.com then the default will be tried    first because it has priority “0”. Followed by xyz.com

  • 0 Users Found This Useful
Was this answer helpful?

Related Articles

CREATE A MYSQL DATABASE IN CPANEL

Step 1: After logging into cPanel, on the Home Screen. Click on ‘MYSQL Database Wizard’...

CREATE A SUBDOMAIN IN CPANEL

Step 1: On the home screen of the cPanel, click on ‘Sub Domain’     Step 2: Enter the prefix...

CREATE ADDITIONAL FTP ACCOUNTS IN CPANEL

Step 1: On the Home screen of the cPanel, Click on FTP Accounts under ‘Files’ tab       Step...

CREATING A DOMAIN ALIAS IN CPANEL

A domain alias is useful when there are additional domain names and you want to make your website...

CREATE AN ADDON DOMAIN IN CPANEL

Step 1: On the Home screen of the cPanel, Click on the “Addon Domains”      Step 2: Add the...